January 9th, 2014 | Tags:

powershell

Microsoft back in October released an LRS deployment guide (if you reviewed this upon release it was beta, so it’s worth re-reviewing the 1.0 version), however if you’re just looking to create a standard account with associated Exchange room mailbox follow the 10 easy steps below!

Run the following within Exchange Management Shell (these steps will create the room mailbox, define mailbox parameters for LRS calendar join/display and enable for authentication) :

Step 1.

New-Mailbox –Name "<insert display name>" –Alias "<insert alias>" –UserPrincipalName "<insert email address>" –SamAccountName "<insert account>" –FirstName "<insert first name>" –Initials "" –LastName "<insert last name>" –Room

Step 2.

Set-CalendarProcessing -Identity <insert alias> -AutomateProcessing AutoAccept

Step 3.

Set-CalendarProcessing -Identity <insert alias> -AddOrganizerToSubject $false

Step 4.

Set-CalendarProcessing -Identity <insert alias> -RemovePrivateProperty $false

Step 5.

Set-Mailbox -Identity <insert email address> -MailTip "This room is equipped with Lync Meeting Room (LRS), please make it a Lync Meeting to take advantage of the enhanced meeting experience from LRS"

Step 6.

Set-ADAccountPassword –Identity <insert alias>

Step 7.

Enable-ADAccount –Identity <insert alias>


Run the following from the Lync Server Management Shell (these steps will enable the room mailbox account for LRS sign-in, steps 9 & 10 are only required if Enterprise Voice enablement is needed – upon doing so a dial-pad is exposed within the LRS client)

Step 8.

Enable-CsMeetingRoom -SipAddress "sip:<insert email address>" -domaincontroller <insert domain controller FQDN> -RegistrarPool <insert front end FQDN> -Identity <insert alias>

Step 9.

Set-CsMeetingRoom <insert alias> -domaincontroller <insert domain controller FQDN> -LineURI "tel:<insert PSTN number>;ext=<insert extension no.>"

Step 10.

Set-CsMeetingRoom -domaincontroller <insert domain controller FQDN> -Identity <insert alias> -EnterpriseVoiceEnabled $true


That’s it!

September 13th, 2013 | Tags: , , ,

UCS 5.0 delivers a wealth of new Lync related capabilities:

  • Better Together-over-Ethernet (AKA BToE)
  • Support for the Lync Software Updates Service (UCS 5 onwards updates can be pushed out via the Lync Server rather than a Polycom provisioning server)
  • Lync Address Book
  • Call Park
  • Lync Status (Lync configuration information delivered via the handset)
  • Boss/Admin (sharing line appearance)

In this post I’m going to go over pre-requisites for the latter (Boss/Admin), if you’re interested in learning about the features then check out a great overview from Jeff Schertz here.

The Boss/Admin feature in UCS 5.0 leverages native Lync capability in Lync Server 2013, all that is required is to add delegates by using Call Forwarding Settings within the Lync Client followed by selecting either Call Forward or Simultaneous Ringing to activate the feature. (see below)

BossAdmin01

One word of warning however is for folks still utilising Lync Server 2010, whilst this feature is supported an extra administrative step is required (this is configured out of the box with Lync Server 2013).

To enable the feature for Lync Server 2010 you need to run a Microsoft SQL command against your backend database (specifically the RTC database), for Standard Edition this will be co-located with your Front End and for Enterprise Edition this will be located on a dedicated SQL Server.

Before you run the command you can check to see whether the “dialogInfo” category has been created or not by executing the following command (change the server be.contoso.local to the name of the server running the RTC database):

osql -E -S be.contoso.local\RTC -Q "use rtc;select * from CategoryDef"

In my case this had not been created and the query returned 19 rows “dialogInfo” wasn’t one of them. To add this element to the database execute the following command (again replacing the be.contoso.local server name with your own):

osql -E -S be.contoso.local\RTC -Q "use rtc;exec RtcRegisterCategoryDef N'dialogInfo'"

That’s it!

August 30th, 2013 | Tags: , ,

A year ago I posted an article that detailed an update for the CX7000, specifically version 1.1, this introduced a number of new features one major feature being support for Office 365.

However there was a calendaring limitation, the scenario is whereby you book a meeting and invite the CX7000 or mailbox associated to the room. This in turn accepts or declines the booking (based upon availability) and updates the CX7000 calendar/home screen with the necessary metadata to facilitate a “one click to join” online meeting.

Long story short this is a common expectation from a video conferencing system and the workaround for Office 365 folks was to utilise the hot-desking functionality (also introduced within the 1.1 update).

One year on Polycom releases a new update to the CX7000, yes you guessed it…version 1.2! 😆

This release includes a number of new features, specifically:

  • Support Microsoft Lync Server 2013
  • HDMI input support for content sharing
  • VGA content auto-detection and shared window auto-popup and auto shutdown
  • Full-screen VGA content window in Lync multiparty meetings
  • User interface enhancements
  • Microsoft Exchange Impersonation

Most of these new features are fairly self-explanatory, except the last item – Microsoft Exchange Impersonation.

Exchange Impersonation leverages an Exchange Web Services Managed API to enable a service account to access and use the rights of — or “impersonate” — one or more specified user accounts and perform certain types of mailbox operations for those accounts.” For more information on this API, it’s well documented on MSDN here.

By utilising this API the CX7000 is able to gain access to the Room Mailbox calendar via a service account, thus resolving the aforementioned calendaring shortfall.

So how do you set this up? Never fear I’m going to explain this process below with a short step-by-step guide on how you make this work within Office 365 multi-tenant (this capability can also be utilised within Office 365 dedicated, but I will not be documenting this process).

Step 1. Connecting PowerShell to your Office 365 tenancy, for this you need to run:

$LiveCred = Get-Credential

This will then prompt for your tenancy admin credentials. Next run the following command:

$Session = New-PSSession -ConfigurationName Microsoft.Exchange –ConnectionUri https://ps.outlook.com/powershell/ -Credential $LiveCred -Authentication Basic –AllowRedirection

This command will initiate the connection to Office 365. Then run:

Import-PSSession $Session

This will import and load the necessary PowerShell cmdlets.

Step 2.  Prepare Exchange Online objects. Within the Microsoft Online data centers, certain objects are consolidated to save space. When you try to use Windows PowerShell to modify one of these objects for the first time, you may encounter an error. By running the cmdlet below tenant administrators are able to create or modify objects within their Exchange Online organization. Proceed by executing the command:

Enable-OrganizationCustomization

Leave your PowerShell session open, we’re going to re-visit this in a moment

Step 3. Create a Room Mailbox within the Exchange Online administration portal (see below)

mailbox-imp01

I’ve created a Room Mailbox called “sjroom”, this in turn creates a user within Office 365 without any assigned licenses or authentication capabilities.

Step 4. Assign licenses to the Room Mailbox account and enabled authentication (see below)

mailbox-imp02

In this step you need to assign licenses (Lync being a minimum) and reset the password, once the password is reset you need to sign-in and change this to a permanent password.

Step 5. Create your mailbox service account, no licenses need to be applied and once created you need to sign-in and create a permanent password, I created an account called “mailboxservice”

Step 6.  Assign mailbox impersonation rights to your service account by executing the following command within the PowerShell session you created earlier:

New-ManagementRoleAssignment –Name “Mailbox-Impersonation” –Role “ApplicationImpersonation” –User mailboxservice@<tenantname>.onmicrosoft.com

Step 7. Ensure the comments are not deleted from within Room Mailbox invitations, without doing this your appointments will get their Lync meeting meta data removed, so click-to-join will be broken.

Set-CalendarProcessing “sjroom” -DeleteComments $false

Step 8. Provision your CX7000 with the “sjroom” account by completing the start-up wizard, this can be re-invoked by resetting within the admin settings (this does not rollback the update/version of the system software).

Step 9. Configure the Room Impersonation settings. The e-mail address should be for the room account/mailbox (in my case sjroom@<tenant>.onmicrosoft.com) and the username/password for the service account (in my case mailboxservice@<tenant>.onmicrosoft.com) – see example below:

mailbox-imp03a

Following this step your home screen calendar should be populated with Lync invitations. For more information on the 1.2 update for CX7000 go to the support page at http://support.polycom.com/PolycomService/support/us/support/video/cx/cx7000.html

August 23rd, 2013 | Tags: ,


This may perhaps be a niche case as I’m aware there aren’t many folks than have braved split-domain configuration with Lync on-prem and Lync Online, but to those that have (and still see the value in this type of deployment, which even without telephony there still is I might add), you are likely at some point to get the request for enabling Lync-to-Skype connectivity.

Lync-to-Skype connectivity was announced earlier this year, this of course was inevitable when Microsoft bought Skype back in mid-2011 and many (like myself), made these amongst other predictions – okay so Microsoft still haven’t made good on some of them but never say never, right?  🙂

If you’re looking for more information on how to deploy a regular on-premises enablement of Skype, I won’t be covering that here as Microsoft have an extensive deployment guide. What I’m going to cover is how to go about this process when you’re deploying (or have already deployed) split-domain.

So there’s

  1. The wrong way (AKA the way I went :oops:) and by this I mean enabling Skype connectivity after deploying split-domain – I’ll explain how to reverse this later…
  2. The right way, enabling Skype connectivity prior to adding your domain to Office 365.

If you’re not subscribed to my feed then it’s likely the wonders of SEO have brought you here and you need to know how you can reverse the (pardon the pun) “PIC”le you’re in  😉

It can be done easily, without intervention from Microsoft Office 365 support…

1. Log into Office 365 as an administrator, then head for the Lync administration page. Once here go to Organization -> External Communications. Next disable public IM connectivity.


SkypeSplitDomainPIC01


2. Wait 24 hours…
3. Apply for PIC enablement (or Skype connectivity provisioning), if you tried this previously then this process would fail as it would effectively appear to the PIC administrator that you’re already enabled (as per the PIC enablement within Lync Online above)
4. Wait again for this to be enabled, this will be confirmed via email
5. Once you’ve received your email confirmation then you’re all set and you can re-enable the setting you disabled in step 1!

That’s it!

July 12th, 2013 | Tags: , ,

wpc_2013_logo_06-blue-(rgb)-

This week I had the pleasure of attending Microsoft’s Worldwide Partner Conference, this is a major event for partners and an opportune moment for vendors like Polycom to showcase their latest and greatest solutions for Microsoft customers (in our case Lync).

Polycom announced two updates:

1) The next generation CX5000 (or for Microsoft purists the “RoundTable”), this has been in development for some time and unlike the current version, the CX5000 HD, it has been entirely re-engineered by Polycom taking advantage of the new video capabilities within Lync 2013 and major audio enhancements including Polycom HD Voice and Audio Echo Cancellation (AEC). Specific video improvements are 1920×288 for panoramic video and up to 1080p for active speaker video. Another item worth noting is that this will be delivered in two flavours the CX5100 which will be USB-only and CX5500 with integrated IP telephony (this is particularly useful for those that want to deliver enterprise voice without the need for Lync client USB tethering. For a video demonstration at WPC head here.

2. Polycom UCS Version 5.0 for VVX handsets, this update is great news and brings major enhancements for Lync customers. Specifically:

  • Call Park
  • Lync Directory
  • Lync Server delivered software updates – updates to the Polycom VVX handsets can be delivered via the Lync Server, which may in many cases negate the need for a Polycom provisioning server.
  • Boss/Admin (or shared line appearance)
  • Better Together over Ethernet (BToE) – this is much like the tethering process available on the CX600, but does not require the use of a USB cable, instead the Ethernet cable is utilised.

Whilst at WPC I ran a demo for Call Park and Lync Directory here and BToE here (thanks to Takeshi for recording/posting the videos)

For more on this announcement, check out the Polycom press release here. Expect the CX5100 to land, along with UCS 5.0 in Q3 2013.

Next Generation RoundTable

Call Park and Lync Directory

BToE

May 10th, 2013 | Tags: , ,

In my previous post I walked through the process of registering a Lync Phone Edition handset directly with Lync Online, I also promised I’d re-visit this and provide a similar walk through for a split domain configuration.

Introduction to “Split-domain”

Prior to the Wave 15 Office 365 the only option for Lync split tenancy would be the process of deploying Lync on-premises and Federating with Lync Online, there was/is a drawback with the approach. Namely your on-prem Lync accounts are utilising a SIP namespace that is say fabrikam.com and the hosted instance is say contoso.com, directories are also inconsistent and needless to say you end up with a fairly disjointed experience.

Split domain support within the Lync 2013 Edge Server (and respectively Lync Online 2013) delivers a more joined up experience whereby both on-premises users and users homed within Lync Online share the same SIP namespace (see illustration below)

 Split-Domain

This illustrates a Lync Online user hosted within Office 365 (connecting over the Internet) and an on-premises homed user registering either via the Internet (over the Lync 2013 Edge) or internally via the Lync Front End (Microsoft support either Lync 2010 or 2013 Front End Servers, but the Edge can be must be 2013-based Correction: Lync 2013 or Lync 2010 Edge Servers are supported, for 2010 Edge the February CU must be applied and Lync 2013 administrative tools must be deployed, more information on this here). In both instances the users share the contoso.com SIP namespace.

Split-domain Deployment

Microsoft’s TechNet documentation is obviously always a good place to start, but I decided that there would be value in adding some more detail to the process. Also at time of writing there are some minor typos within the PowerShell commands – I’ve informed Microsoft that this needs updating.

First up you need to configure your Office 365 tenancy for ADFS, I won’t cover this process here but there are some great guides/blog posts on this from other MVPs (one I’d recommend from Tim Harrington here). I will however say that this process has become a lot more streamlined within Windows Server 2012, so I’d recommend (where possible) the deployment of both the ADFS (a service that can be added via 2012 Server Manager) and Windows Azure Active Directory Sync Tool (often referred to as “DirSync”) on this platform versus Windows Server 2008.

Also not that the appropriate Office 365 plan is required for split-domain support and ADFS, at time of writing Lync Plan 3 incorporates this capability (alternatively you can purchase an E3 which also includes Lync Plan 3). One last note, if your tenancy has not been upgraded to Wave 15 (2013) you’ll need to hang fire – most at time of writing would have already been migrated.

Once your domain is authorised for use with Office 365 and ADFS is configured you can start the split-domain configuration.

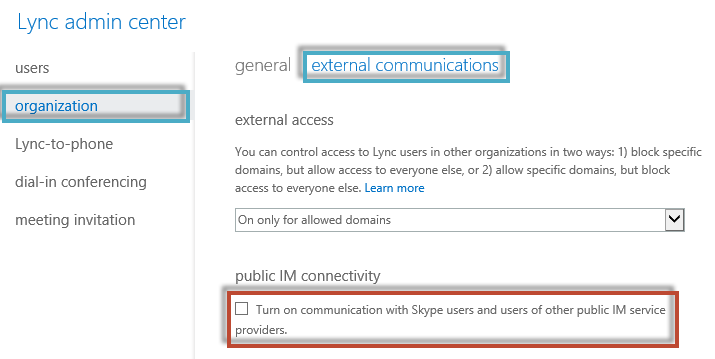
Step 1. Enable Federation within your Office 365 tenancy (naturally you’ll need to be an admin to do this). Within Lync Administration, Organisation and External Communications

splitdomain-step01

Now is also a good time to activate/license the users you wish to move into Lync Online

Step 2. Configure your Lync 2013 Edge Server for Federation, the following cmdlet should be executed via you Front End: (if not already enabled which may be the case is Remote Worker/Federation is already deployed)

Set-CsAccessEdgeConfiguration -UseDnsSrvRouting -AllowOutsideUsers 1 -AllowFederatedUsers 1 -EnablePartnerDiscovery 1

Step 3. Federate with Office 365, if you already have Lync Online configured as an existing hosting provider run the following cmdlet:

Set-CsHostingProvider -Identity LyncOnline -EnabledSharedAddressSpace $true -HostsOCSUsers $true -VerificationLevel UseSourceVerification -AutodiscoverUrl https://webdir.online.lync.com/Autodiscover/AutodiscoverService.svc/root

If Lync Online is not configured as an existing hosting provider run this cmdlet instead:

New-CSHostingProvider -Identity LyncOnline -ProxyFqdn “sipfed.online.lync.com” -Enabled $true -EnabledSharedAddressSpace $true -HostsOCSUsers $true -VerificationLevel UseSourceVerification -IsLocal $false -AutodiscoverUrl https://webdir.online.lync.com/Autodiscover/AutodiscoverService.svc/root

This is effectively where the magic happens, note the new “EnableSharedAddressSpace” switch this is utilised specifically for split-domain capability within Office 365.

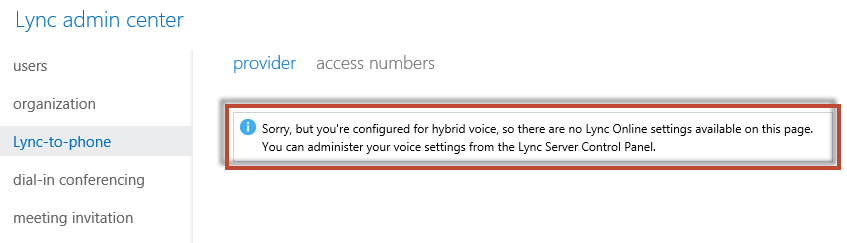
Step 4. Enable your Office 365 tenancy for split-domain, unfortunately this is the painful part whereby I can’t provide any magic PowerShell. Alas at time of writing this means a calling into Office 365 technical support, in my case it was reasonably straight forward and this process was complete within 24hrs. Note: Once this is complete Lync-to-Phone is no longer available, this is a shame in my opinion and I hope to see this change.

splitdomain-step04

Step 5. Move your “chosen” Lync users into Lync Online, once your tenancy is enabled you can complete your mission and move users. To make this happen you’ll need to enable PowerShell connectivity for Office 365, this is achieved by installing the Microsoft Online Services Sign-In Assistant (Download: here) – in my case I installed this on my Lync Front End.

Next input your Office 365 administrator credentials by running the following cmdlet within the Lync Server Management Shell

$creds=Get-Credential

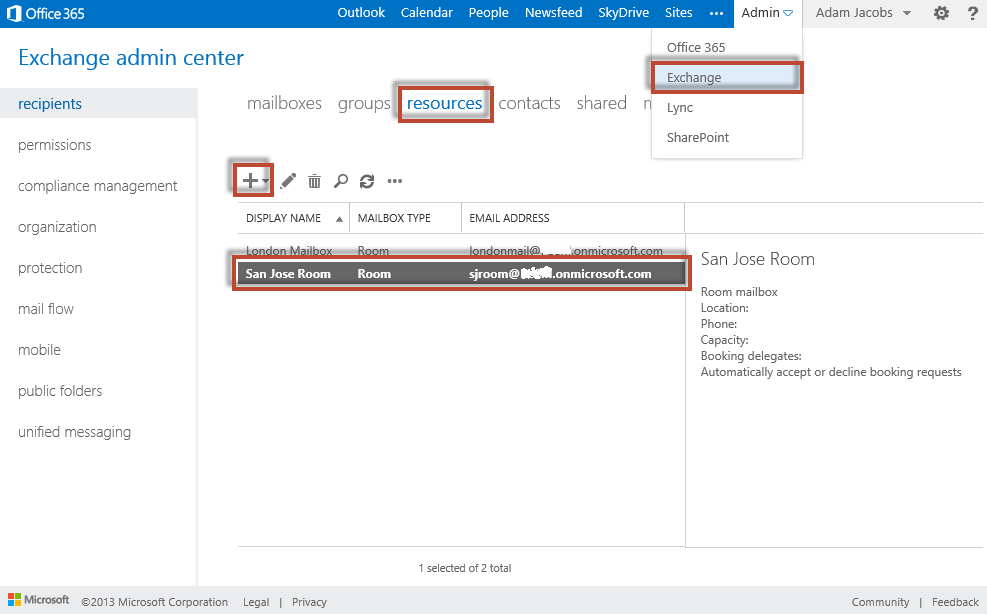
Before you can move your chosen user you’ll need to locate your hosted migration service URL, this can be achieved by logging into the Office 365 portal and then accessing the Lync Administration Center. Within the address bar you’ll notice your admin URL (see mine below)

splitdomain-step05

This URL should be appended with:

/HostedMigration/hostedmigrationservice.svc

The resulting URL would therefore in my case be:

https://admin0a.online.lync.com/HostedMigration/hostedmigrationservice.svc

So to move your user the complete command would be: (substituting the SIP URI for the on-premises Lync user you would wish to move)

Move-CsUser -Identity <sipuri@fqdn.com> -Target sipfed.online.lync.com -Credential $creds -HostedMigrationOverrideUrl https://admin0a.online.lync.com/HostedMigration/hostedmigrationservice.svc

To verify the move was successful, run the following cmdlet:

Get-CsUser -Identity sipuri@fqdn.com

The hosting provider should be as follows:

splitdomain-step05b

The other (and more gratifying) way of validating a successful move would be via the Lync Online Administration Center.

Once you’ve successfully registered your Lync client with Office 365 you can also (by referring to the previous guide) register your Lync Phone Edition handset. In my next article I’ll focus on Hybrid Exchange and Lync Phone Edition – stay tuned!