October 3rd, 2016 | Tags:

msignitelogo

So at Ignite Albert Kooiman and I had the opportunity to re-unite and present some more details around the new Office 365 video interoperability service both Polycom and Microsoft are co-developing. This was a 300 level session where Albert and I started with a general overview and then went into more architectural details on this new service due for public preview later this year.

The session is embedded below and PowerPoint available for download here (this is not available on the event page right now)

September 1st, 2016 | Tags:

Picture1

Earlier this year Polycom and Microsoft jointly announced a new joint cloud video interoperability service.  The goal here is giving Microsoft’s Skype for Business Online users a way to schedule meetings with the ability to easily add video room systems from vendors like Cisco, Polycom, LifeSize etc. You know, the kinds that either don’t play nice with Skype for Business or have direct Microsoft registration capabilities.

This sounds easy right? Well often this isn’t the case, you might need to deploy various boxes, go through a complex integration or even break the existing Skype for Business end-user workflow. This new service is geared toward making this easy, the technology is Polycom’s RealPresence Platform and the solution itself is RealConnect. This is all to be fully integrated with Office 365, hosted within Microsoft Azure and operated by Polycom.

Over the next few months more detailed information will be shared, next week Albert Kooiman and I will discuss this solution and also provide a demo of the experience, so don’t miss our Skype for Meeting Broadcast. Then at Ignite expect an even deeper dive on how this all works.

Webcast join details below:

Join Polycom and the Skype for Business team to hear and see a demo of the new Polycom cloud-based video interoperability service for Office 365 users. Built directly into the Skype for Business workflow, users can easily use this service to create an online meeting that Office 365 and other video endpoint users can join.

Join the Skype Meeting Broadcast, Friday, September 9, 2016, at 9:00 a.m. PST.

Speakers: Angela Donohue, Albert Kooiman, Adam Jacobs

Update: Recording from the Skype Meeting Broadcast is now posted online

January 7th, 2016 | Tags:

Late last year Polycom released UCS 5.4.0 for their VVX portfolio, this was a major milestone as it introduced the ability to register to Skype for Business Online and Microsoft’s new Cloud PBX service. Whilst the VVX handsets are the first and (as I write) only 3PIP devices to support Microsoft’s online authentication mechanism “Org-ID”, the Lync Phone Edition handsets have supported this capability since their CU7 update.

Note: For those interested about Office 365 authentication, whilst Org-ID is the current mechanism, this is being transitioned to a new OAuth-based protocol – ADAL. Both are expected to work side-by-side until this transition is completed by Microsoft.

For more information on how to update your VVX to UCS 5.4.0 refer to a post by Jeff Schertz, here as I will spend time throughout the rest of this article to cover Skype for Business Online IP Phone Manageability.

3PIP IP Phones typically have their own way of being managed, in many cases via a vendor-specific XML files which in turn are provisioned via a centralized server – typically a secure Web or FTP server. Snom some time back introduced the ability to leverage Lync in-band policies by adding custom parameters via PowerShell, whilst this worked it very quickly became difficult to manage and does not address use cases whereby a phone requires a base configuration i.e. correct time/date and the phone itself isn’t signed-in.

We’ve also seen Event Zero take this further and provide a subscription-based solution, UC Commander, this can be hosted on-premises or in their cloud and gives you all the granular controls you might need (at a cost) within an extremely intuitive web-based graphical user interface.

With Microsoft’s Cloud PBX a base set of parameters can be configured via Online PowerShell, to connect to Skype for Business Online PowerShell, follow the following steps:

  1. Open PowerShell, type $credential = Get-Credential
  2. When prompted enter your tenant admin credentials
  3. Leverage the credentials to connect to Online PowerShell by typing, $session = New-CsOnlineSession -Credential $credential
  4. Import the Online Powershell session by typing, Import-PSSession $session
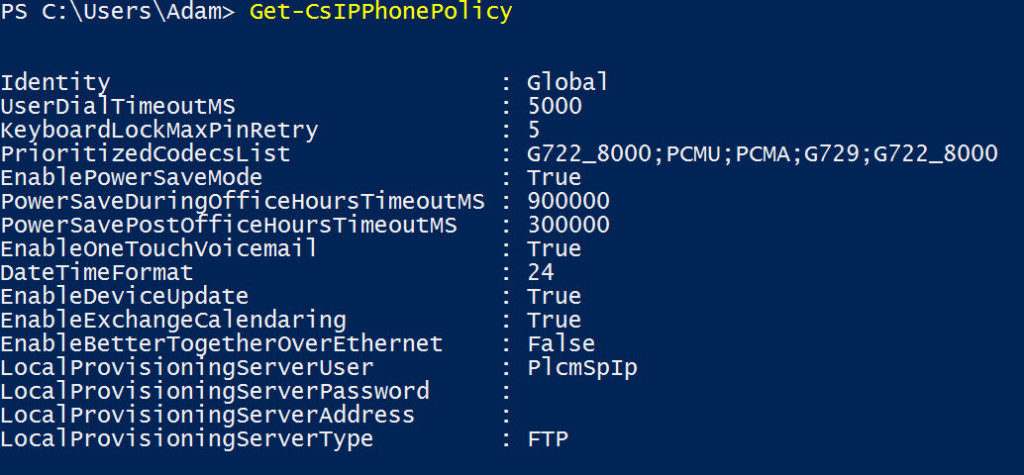
  5. To retrieve all available manageability commands type, Get-CsIPPhonePolicy (see output below)

If anything doesn’t go to plan, refer to Microsoft TechNet documentation on Connecting to Skype for Business Online by using Windows PowerShell

Get-CsIPPhonePolicy

So let’s take a look at these parameters and how to change them. First off you might notice that none of these share the same names as their vendor-specific counterpart, that’s due to the fact that some of these may become common between vendors. I’ll however focus on those that are specific to Polycom 🙂

Parameter Default Value Description
UserDialTimeoutMS  5000 Specifies the time in milliseconds to wait in On-Hook mode before dialing out automatically. If a user enters a phone number and does not click dial, the system will dial the number after the number of milliseconds specified. The default is 5000.
EnablePowerSaveMode  True If enabled, phone goes to power savings mode (display turns off) based on values of the PowerSaveDuringOfficeHoursTimeoutMS and PowerSavePostOfficeHoursTimeoutMS parameters.
PowerSaveDuringOfficeHoursTimeoutMS  900000 Specifies the time in milliseconds to wait during office hours before turning on Power Save mode. The default is 900,000.
PowerSavePostOfficeHoursTimeoutMS  300000 Specifies the time in milliseconds to wait after office hours before turning on Power Save mode. The default is 300,000.
EnableOneTouchVoicemail  True Specifies whether the Visual Voicemail feature in Skype for Business Online is enabled. If set to $true, the feature is enabled, otherwise $false.
EnableDeviceUpdate  True Specifies whether the IP device will be updated by the Skype for Business Online service. If set to $true, IP devices will get firmware updates from the service, if $false the device will not be updated. The default is $true. Customers with an on-premises provisioning server are expected to change this to $false
EnableExchangeCalendaring  True Specifies whether an IP device is enabled to connect to the Exchange Online calendaring service. If $true, users are able to connect to their Exchange calendars. If $false, users will not be enabled to connect to their calendars. The default is $true.
EnableBetterTogetherOverEthernet  True False Specifies whether the Better Together Over Ethernet (BTOE) feature is enabled for users. If $true, and if the BTOE plugin is installed on the IP device, the user can tether the device to a PC and sign in to Skype for Business Online. The default is $true $false.
LocalProvisioningServerUser Blank Specifies a username for the provisioning server.
LocalProvisioningServerPassword Blank Specifies the password for the provisioning server.
LocalProvisioningServerAddress Blank Specifies the address of the provisioning server for your organization.
LocalProvisioningServerType  FTP Specifies the server type for the phone. The default is FTP.

To change/set a parameter type:

Set-CsIPPhonePolicy -<ParameterName> <InputType>

For a full list of parameters refer to this TechNet document.

September 10th, 2015 | Tags:

Update: Further testing suggests that there is in fact no TLS validation performed against the Match URI, instead the TLS validation is performed against the Trusted Application Pool name. In my example below both the Trusted Application Pool name and Match URI are the same. However if your Trusted Application Pool name is different to the Match URI you should follow the steps below but supplement the Match URI for the Trusted Application Pool name. Apologies for the confusion.

Lync and Skype for Business have a concept of configuring static routes, this is not to be confused with the networking equivalent, but more a way or routing SIP queries (for a specific domain) to either a PBX, CSTN Gateway or a 3rd party conferencing solution.

In this article I’m going to cover off the use case whereby a 3rd party conferencing solution has been deployed and the ability to dial “Virtual Meeting Rooms” is required. This is different to newer Skype for Business interoperability solutions, for example “RealConnect” first introduced by Polycom and then an imitation “Dual Home” by Acano.

For those that are deploying VMRs with Skype for Business (or already have this deployed and are upgrading to Skype for Business) read on…

Typically when 3rd party MCUs or conferencing components like Polycom DMA or Cisco VCS are deployed they’re configured within a Trusted Application Pool. Within the example below we have a Trusted Application Pool configured, with two Trusted Applications. Whilst the Trusted Application Pool is defined as “video.domain.com”, this has no bearing upon the SIP domain which could be entirely different.

For simplicities sake in this scenario my SIP domain is also “domain.com” and my “Match URI” i.e. the domain being leverage to trigger my static route will be “video.domain.com”.
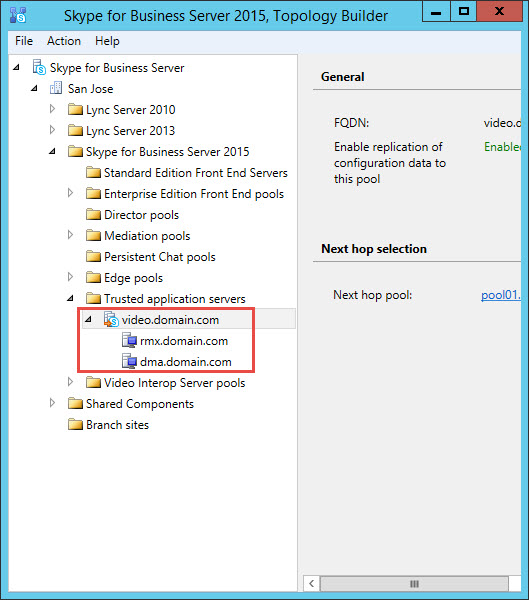
MatchURI01

So what’s new, why write this article at all? Previously, dating as far back to OCS and until Lync Server 2013, a Match URI could be configured without any TLS validation. So to use the above example I could generate a certificate for my Trusted Application Server with the FQDN of the server i.e. dma.domain.com and I was good to go.

However with Skype for Business the TLS route is now validated, so in the case above I need to generate a SAN that encompasses both the FQDN for my Trusted Application Server and the Match URI. Failure to do this will generate a “certificate trust with another server could not be established”.
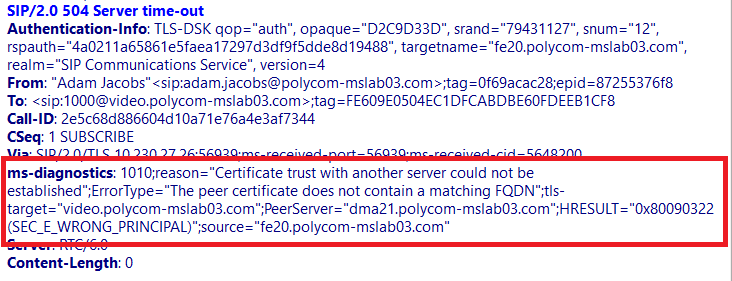
SnooperLog

Let’s step through this process, first off let’s recap on the goal. My Trusted Application Server is dma.domain.com and my Match URI is video.domain.com, I’m using a Windows Enterprise Certificate Authority and I need to generate my certificate.

Usually I’d use IIS to generate my certificates in this scenario, but we’re creating a SAN and whilst this is possible leveraging the certificates MMC snap-in – I like simplicity 🙂

So I’m going to use a free/excellent utility from my friends at DigiCert, they’re certificate utility for Windows is an easy way to create certificate signing requests (CSRs) – it’s also got my out of some tricky spots and performs certificate repair and troubleshooting.

Step 1. Create my certificate request

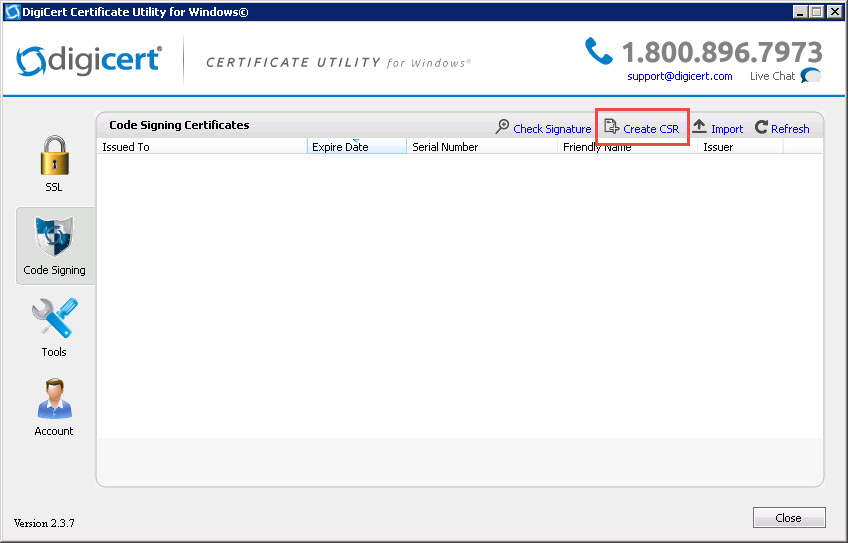
Open the certificate utility executable from one of your Front Ends and select the “Create CSR” dialogue on the top right (see below)
MatchURI02

Step 2. Complete the certificate request

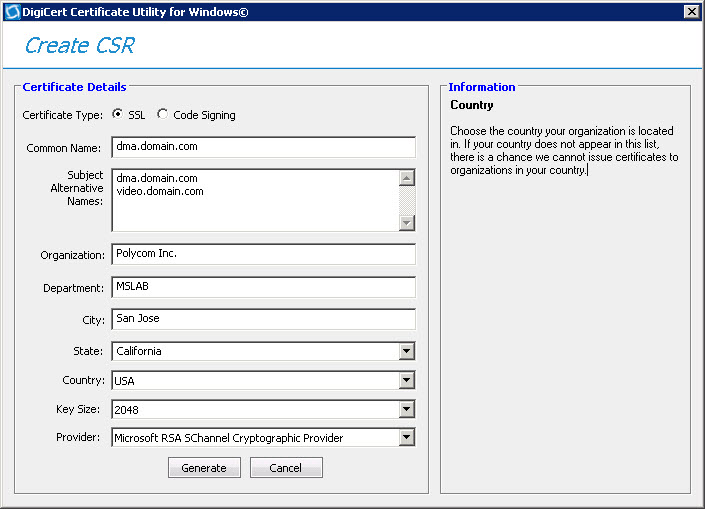
Ensure the certificate type is set to “SSL” and that your common name is duplicated and also specified within your subject alternative names.
MatchURI03

Step 3. Generate and save to file

MatchURI04

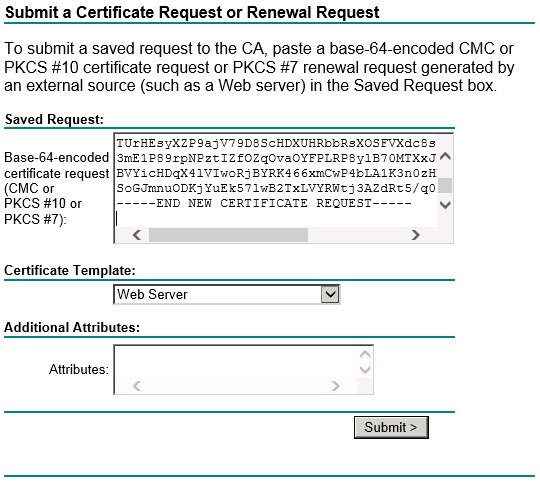
Step 4. Upload the certificate signing request file to your respective Windows CA, typically this can be performed via web enrollment by connecting to http://<CA.FQDN>/CertSrv. You will then be prompted to authenticate, once presented with this initial menu select -> Request a certificate -> Advanced certificate request.

Then paste as follows and ensure you change the certificate template to “Web Server” and click Submit.
MatchURI05

Step 5. Download the certificate

MatchURI06

Step 6. Complete the request and import the certificate

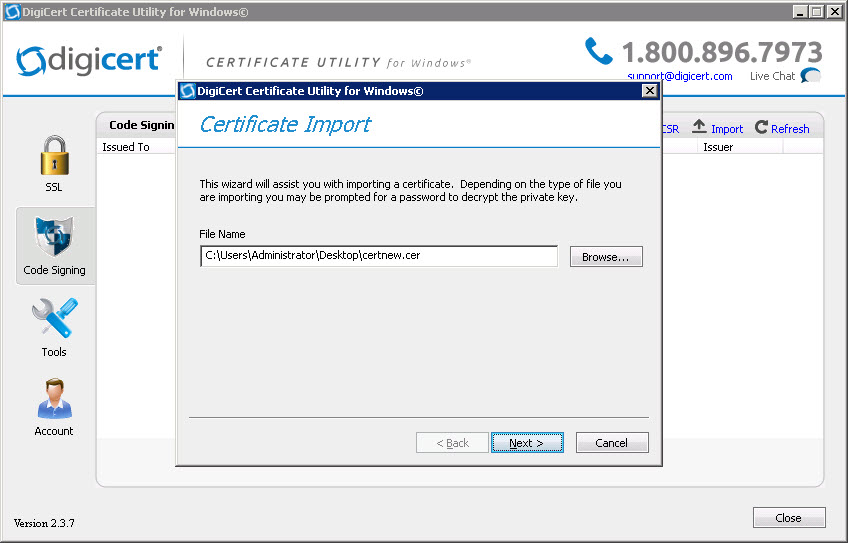
Click import on the top right, point to the certificate file and assign a friendly name for easy identification.
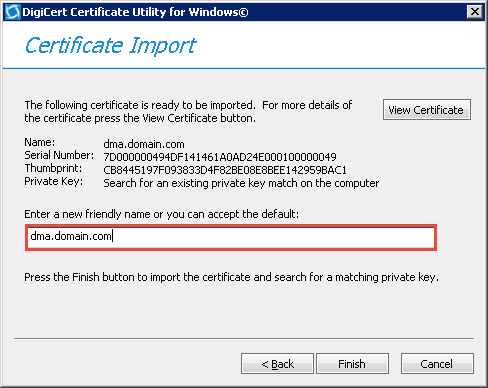
MatchURI07a

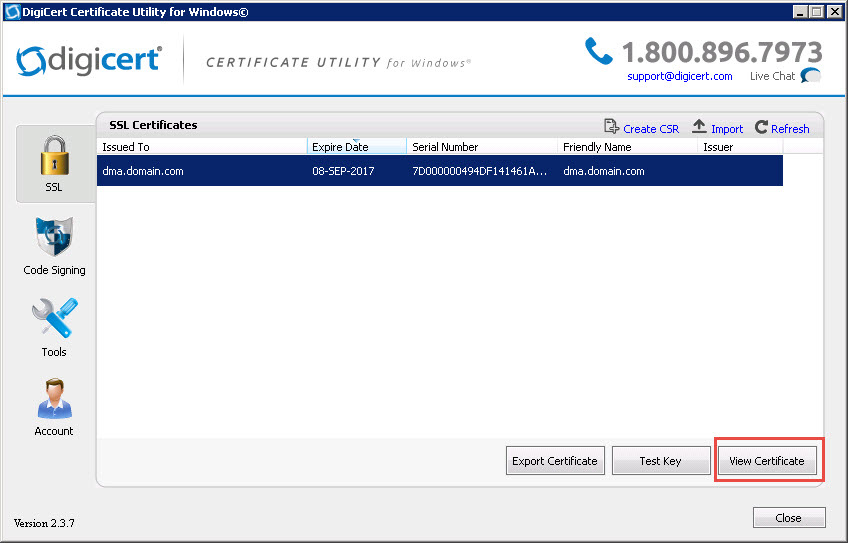
MatchURI07 Step 7. Validate your certificate

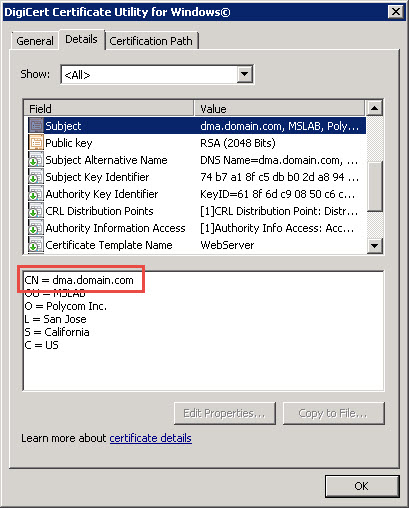
The certificate common name displays the Trusted Application Server FQDN (dma.domain.com) and the Subject Alternative Names contain both the Trusted Application Server FQDN (dma.domain.com) and the Match URI (video.domain.com).
MatchURI08

MatchURI09

MatchURI10

Now proceed to upload the certificate to your 3rd party conferencing server and TLS errors are a thing of the past!

February 7th, 2015 | Tags: , , ,

It’s great to see the momentum behind Lync (now Skype for Business). I’m specifically referring to businesses with long-time installments of PBX(s) are realizing the traditional telephony functionality which is now available within Microsoft Enterprise Voice (in this I’m referring to Skype for Business telephony). Admittedly there are some gaps, but these are now niche scenarios and are no doubt likely to be addressed as Microsoft preps they’re next server release – Skype for Business Server 2015.

Microsoft’s Third Party Interoperability Program or “3PIP”, plays a big part in this as Open SIP device manufacturers differentiate over the “Aries” or Lync Phone Edition handsets. An excellent example here is the Share Line Appearance or Boss-Admin functionality introduced in Lync 2010. By leveraging existing delegate functionality (typically set client-side) and additional SIP extensions sent server-side these phones can offer extended telephony scenarios.

These features can include:

  • Boss call pickup
  • Boss in call/held call indication
  • Transfer to Boss Voicemail
  • Inbound call to Boss pick-up
  • Outbound calling on behalf of

Now in the case of traditional telephony administration typically the configuration for thereof would be performed by IT, so it’s not an unfamiliar request for customers to push back on the idea of offloading this to their end-users. To that end Microsoft has provided a command line tool which is included within the Lync Resource Kit (I’m sure in time this will receive the Skype moniker) – the tool is SEFAUtil.

SEFAUtil can be deployed on your existing Front End Server(s). It requires a Trusted Application Server configuration be setup (within Topology Builder) and some simple steps can be followed here.

Once this is configured the delegate configuration (including “Simring”) can be set for specific or groups of users. In the example below we’re going to configure Jennifer Parker as the “admin” for her “boss” Emmett Brown.

In this example my Pool name is “pool01.polycom-mslab02.local”, this should be adjusted accordingly depending upon your Pool name. I’m also executing this command within the Resource Kit directory, which for Lync 2013 is typically “C:\Program Files\Microsoft Lync Server 2013\ResKit”

.\SEFAUtil.exe /server:pool01.polycom-mslab02.local sip:emmett.brown@polycom-mslab02.com /adddelegate:jennifer.parker@polycom-mslab02.com /simulringdelegates

(See example below)

sefautil-delegate

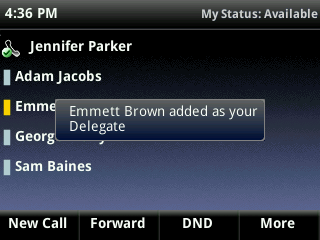
Once this command is set a visual indication is typically seen on your phone, in the case below a Polycom VVX 500 has indicated to the “Admin” (Jennifer Parker) that she’s now capable of accessing the Boss-Admin feature-set on behalf of here “Boss” (Emmett Brown).

vvx-delegate

For more information on Polycom’s Boss-Admin feature refer to this blog post by a fellow Lync MVP Jeff Schertz and for Lync Resource Kit download information this can be obtained via the Microsoft website.

January 30th, 2015 | Tags: , ,

I thought I’d share a video I was asked to put together that illustrated Lync client behavior when a user is migrated from a Lync On-Premises deployment to Lync Online.

Prior to executing the PowerShell below I needed to complete a “Split-Domain” Lync deployment which I covered in a separate article here.

PowerShell commands:

$creds=Get-Credential | Input tenant admin credentials
Move-CsUser -Identity <SIP URI> -Target sipfed.online.lync.com -Credential $creds -HostedMigrationOverrideUrl https://admin0a.online.lync.com/HostedMigration/hostedmigrationservice.svc | see my previous article for tenant specific URL identification
Get-CsUser -Identity <SIP URI> | Validate user migration
Move-CsUser -Identity <SIP URI> -Target <On-Premises Lync Pool Name> -Credential $cred -HostedMigrationOverrideURL https://admin0a.online.lync.com/HostedMigration/hostedmigrationservice.svc | see my previous article for tenant specific URL identification