CX7000 and Room Mailboxes within Office 365
A year ago I posted an article that detailed an update for the CX7000, specifically version 1.1, this introduced a number of new features one major feature being support for Office 365.
However there was a calendaring limitation, the scenario is whereby you book a meeting and invite the CX7000 or mailbox associated to the room. This in turn accepts or declines the booking (based upon availability) and updates the CX7000 calendar/home screen with the necessary metadata to facilitate a “one click to join” online meeting.
Long story short this is a common expectation from a video conferencing system and the workaround for Office 365 folks was to utilise the hot-desking functionality (also introduced within the 1.1 update).
One year on Polycom releases a new update to the CX7000, yes you guessed it…version 1.2! 😆
This release includes a number of new features, specifically:
- Support Microsoft Lync Server 2013
- HDMI input support for content sharing
- VGA content auto-detection and shared window auto-popup and auto shutdown
- Full-screen VGA content window in Lync multiparty meetings
- User interface enhancements
- Microsoft Exchange Impersonation
Most of these new features are fairly self-explanatory, except the last item – Microsoft Exchange Impersonation.
Exchange Impersonation leverages an Exchange Web Services Managed API “to enable a service account to access and use the rights of — or “impersonate” — one or more specified user accounts and perform certain types of mailbox operations for those accounts.” For more information on this API, it’s well documented on MSDN here.
By utilising this API the CX7000 is able to gain access to the Room Mailbox calendar via a service account, thus resolving the aforementioned calendaring shortfall.
So how do you set this up? Never fear I’m going to explain this process below with a short step-by-step guide on how you make this work within Office 365 multi-tenant (this capability can also be utilised within Office 365 dedicated, but I will not be documenting this process).
Step 1. Connecting PowerShell to your Office 365 tenancy, for this you need to run:
$LiveCred = Get-Credential
This will then prompt for your tenancy admin credentials. Next run the following command:
$Session = New-PSSession -ConfigurationName Microsoft.Exchange –ConnectionUri https://ps.outlook.com/powershell/ -Credential $LiveCred -Authentication Basic –AllowRedirection
This command will initiate the connection to Office 365. Then run:
Import-PSSession $Session
This will import and load the necessary PowerShell cmdlets.
Step 2. Prepare Exchange Online objects. Within the Microsoft Online data centers, certain objects are consolidated to save space. When you try to use Windows PowerShell to modify one of these objects for the first time, you may encounter an error. By running the cmdlet below tenant administrators are able to create or modify objects within their Exchange Online organization. Proceed by executing the command:
Enable-OrganizationCustomization
Leave your PowerShell session open, we’re going to re-visit this in a moment
Step 3. Create a Room Mailbox within the Exchange Online administration portal (see below)
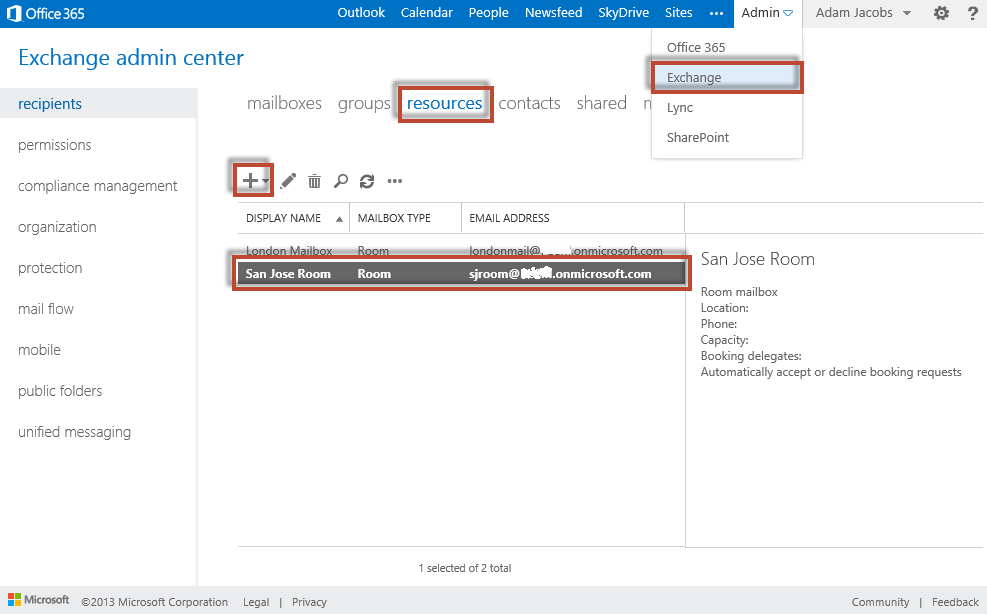
I’ve created a Room Mailbox called “sjroom”, this in turn creates a user within Office 365 without any assigned licenses or authentication capabilities.
Step 4. Assign licenses to the Room Mailbox account and enabled authentication (see below)

In this step you need to assign licenses (Lync being a minimum) and reset the password, once the password is reset you need to sign-in and change this to a permanent password.
Step 5. Create your mailbox service account, no licenses need to be applied and once created you need to sign-in and create a permanent password, I created an account called “mailboxservice”
Step 6. Assign mailbox impersonation rights to your service account by executing the following command within the PowerShell session you created earlier:
New-ManagementRoleAssignment –Name “Mailbox-Impersonation” –Role “ApplicationImpersonation” –User mailboxservice@<tenantname>.onmicrosoft.com
Step 7. Ensure the comments are not deleted from within Room Mailbox invitations, without doing this your appointments will get their Lync meeting meta data removed, so click-to-join will be broken.
Set-CalendarProcessing “sjroom” -DeleteComments $false
Step 8. Provision your CX7000 with the “sjroom” account by completing the start-up wizard, this can be re-invoked by resetting within the admin settings (this does not rollback the update/version of the system software).
Step 9. Configure the Room Impersonation settings. The e-mail address should be for the room account/mailbox (in my case sjroom@<tenant>.onmicrosoft.com) and the username/password for the service account (in my case mailboxservice@<tenant>.onmicrosoft.com) – see example below:
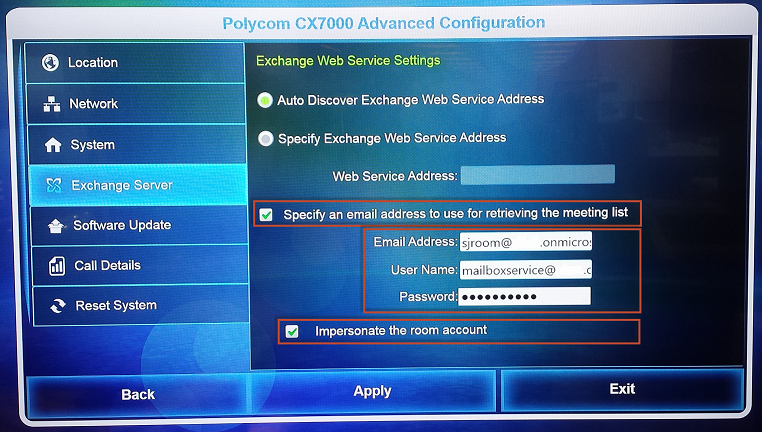
Following this step your home screen calendar should be populated with Lync invitations. For more information on the 1.2 update for CX7000 go to the support page at http://support.polycom.com/PolycomService/support/us/support/video/cx/cx7000.html