Lync 2013 Video Conference Gateway Solution From Polycom
Back at Lync Conference 2014 Dustin Hannifin and I co-presented on the various video interoperability options available for Lync 2013.
I’m specifically calling out Lync 2013 as the video enhancements, specifically the addition of H.264 SVC, created challenges when integrating existing Lync 2010 video solutions. For those that want to know more on this subject I covered this in detail during our presentation – long story short whilst existing support for the RTVideo codec is still included various signaling changes require vendor specific updates.
Of the solutions available today there is an emphasis on all conferences taking place on a 3rd party MCU or bridge. Microsoft’s Video Interoperability Server (VIS) will bring some relief in this area, but in some cases this may not address all scenarios.
Many are already familiar with the Polycom RMX portfolio (don’t be deterred by cost at this point either, the entirety of this platform can now be virtualized and is also available in software), which previously was also limited to the same “meet on the bridge” scenario. But with the recent update a new capability (referred to as “RealConnect for Microsoft Lync” – don’t shoot the messenger I don’t work in marketing 😉 ) is made available. With this feature Lync clients continue to join the Lync Server (or AVMCU) and traditional video VTCs (not specific to Polycom), with an emphasis being on Cisco including their non-standard based “TelePresence Interoperability Protocol” (TIP), LifeSize and any other standards-based system) join the Polycom MCU. Both worlds are then cascaded or barbelled and Microsoft’s SVC is leveraged resulting in up to 5 of the active video participants being composed within the Polycom MCU layout, referred to as “Continuous Presence”.
RealConnect for Lync 2013 Overview
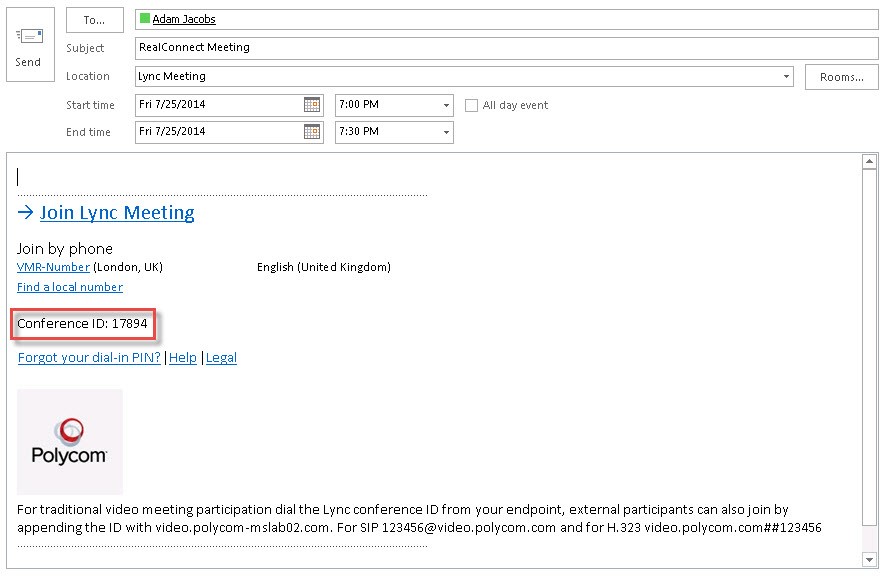
First up you’ll need to schedule the conference call, this achieved in the same way any other Lync conference is scheduled, specifically via a Lync Online Meeting invite – there’s one important attribute within the invitation and that’s the dial-in conferencing ID. This ID is leveraged by the VTC as a way of dialing into the call, so for those who haven’t deployed dial-in conferencing it’s a pre-requisite. Note for those that don’t already have this deployed or have the notion of enabling PSTN dial-in conferencing capabilities – that’s okay – a dummy number can be added, we’ll cover this later.
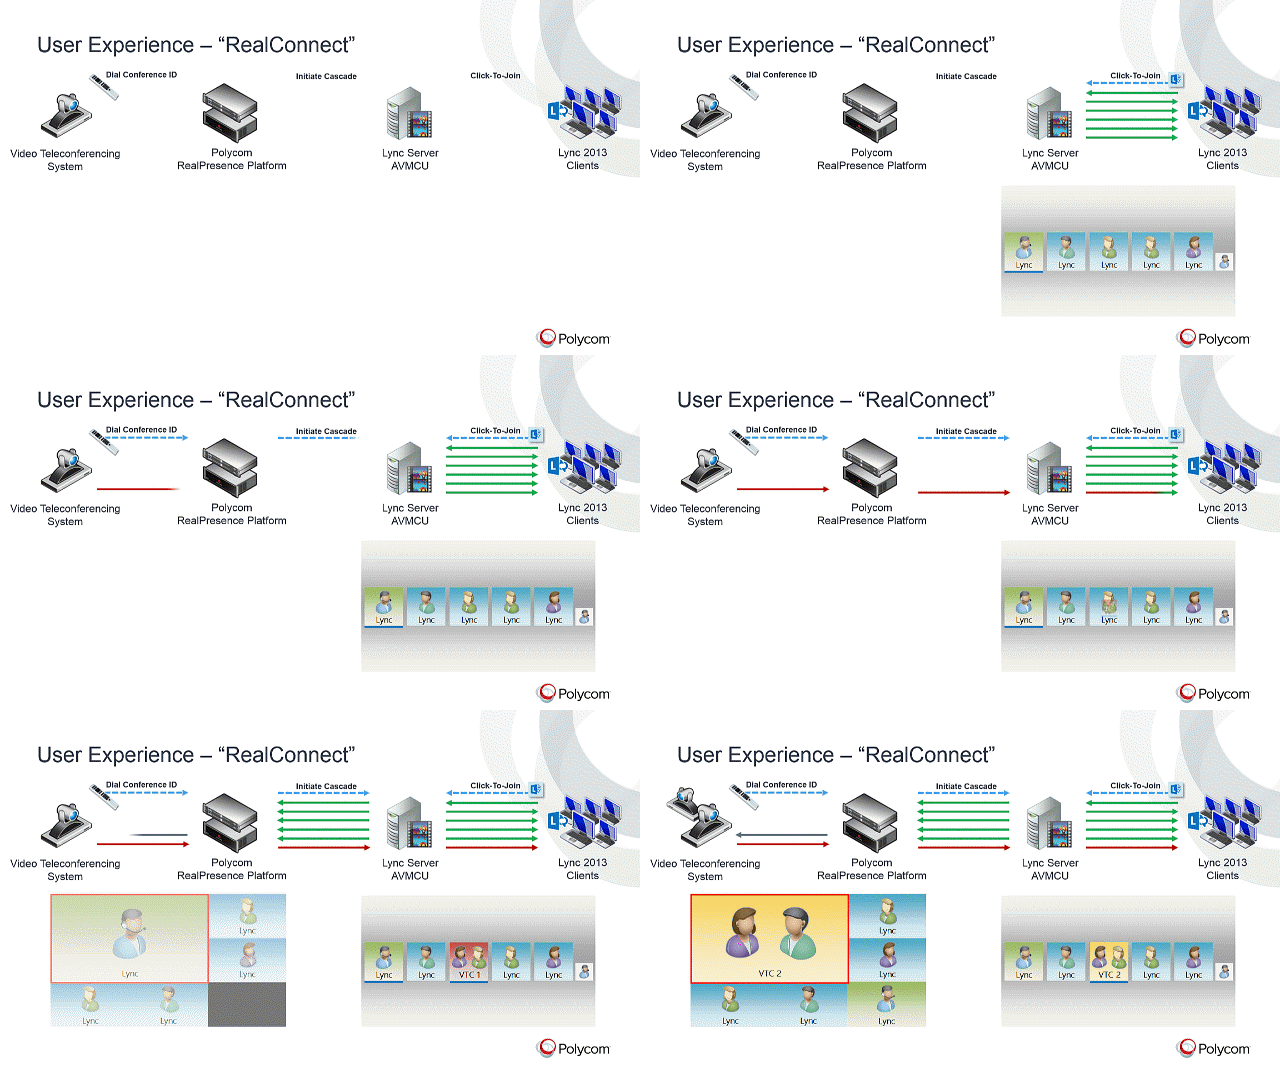
With the invitations sent to all those that are required to join the call, let’s go through the join process and UX. The animation below (credit to Jeff Schertz) illustrates the following steps:
We see the Lync clients (top right) joining the Lync conference (as per the usual process), resulting in an AVMCU call – with that Lync clients are now presented with “Gallery View” video (bottom right).
- Next up (the order of this isn’t important) the VTC(s) join by dialing the meeting’s respective Lync dial-in conference ID (top left).
- The Polycom RealPresence Platform components (specifically RMX and DMA, which are already integrated to Lync), perform a process whereby the Lync conference SIP URI is obtained and an ad-hoc Virtual Meeting Room (VMR) is created, this VMR is assigned the same number as the Lync conference ID and automatically dials into the Lync conference – as though it were another Lync client.
- Once the call is cascaded the VTC is seen as an additional participant within the Lync conference (bottom right) and the existing Lync participants (and their respective video streams, up to 5 of the active) are composed within the RMX layout (bottom left).
- As additional VTCs join the RMX layout increases by one and the existing VMR within the Lync Gallery switches based upon the active VTC speaker.
Deployment Overview
The solution is comprised of two mandatory Polycom infrastructure components:
- DMA (6.1), which handles signaling, Lync conference URI lookup and VMR creation
- RMX (8.4), performs the media handling and connects into the Lync conference
Note: an additional software component is required for deployments where Lync to traditional VTC (and vice-versa) content is required.
I won’t cover the base Polycom RealPresence Platform steps, this is already well documented and this picks up from the point whereby both the DMA and RMX are already deployed and integrated via the Trusted Application process – one difference worth noting here is that creating a “Static Route” is no longer a requirement unless Lync to VMR calling is still a requirement.
Steps:
- Deploy Lync Dial-in Conferencing (if not done so already)
- Customize the Lync meeting invitation, add H.323/SIP dialing instructions
- Configure DMA (SIP Peer)
- Create a RealPresence Platform Lync account
- Configure and enable the DMA Lync conference dial rule
- (Optional if not already configured) Ensure ICE is enabled on your RMX
The following content is an abridged version of the Polycom UC Deployment Guide for Microsoft Environments, this content was created by yours truly and edited by James Hill – the complete guide can be downloaded here.
Step 1. Enable Dial-in Conferencing:
1. Install the dial-in (PSTN) conferencing component for the Lync Front End server or Pool in the Lync 2013 Topology builder by going to Edit Properties > General > Features and Functionality.
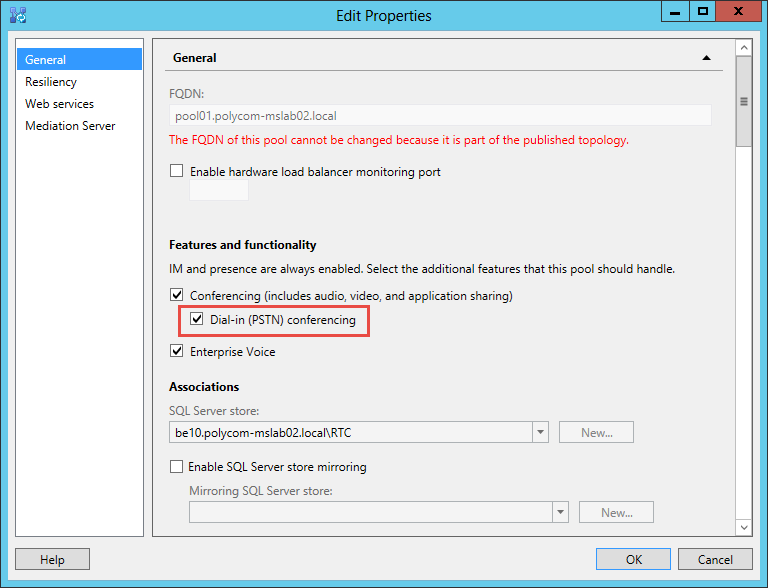
2. Check Dial-in (PSTN) conferencing and click OK.
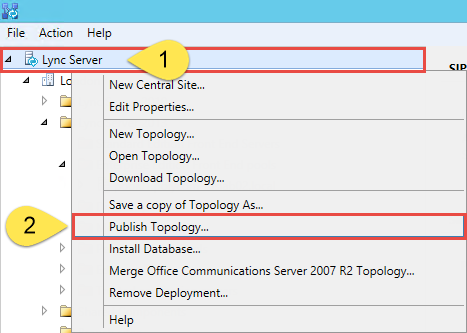
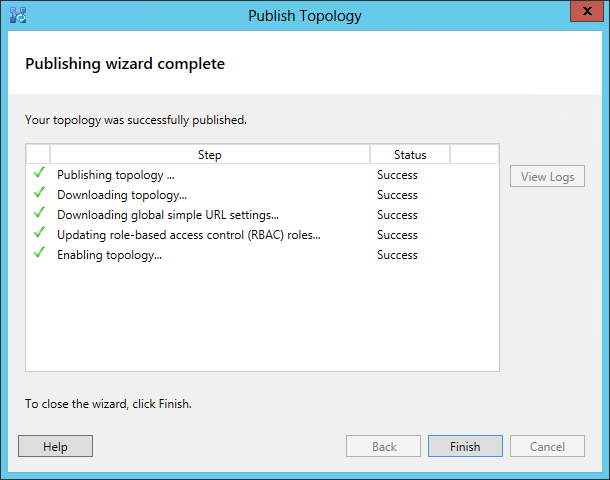
3. Publish the topology by right-clicking the central site name and clicking Publish Topology > Next > Finish.
Once published, the output displays as shown next.
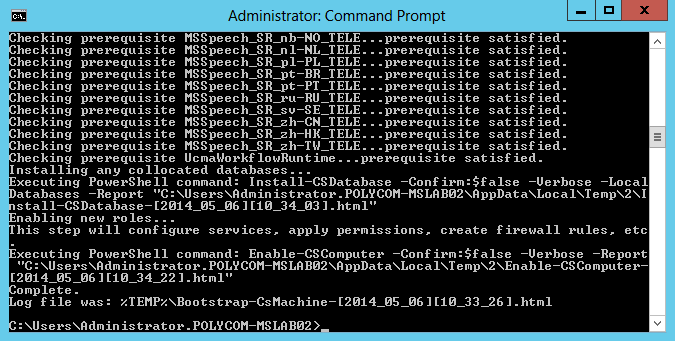
After you change the topology, deploy the application on the Lync Server by running the Lync 2013 ‘bootstrapper’ process.
To deploy the application:
1. Open the command prompt on your Lync Front End server and execute the command:
%ProgramFiles%\Microsoft Lync Server 2013\Deployment\Bootstrapper.exe
2. Install the associated service by opening the Lync Server Management Shell and executing Start-CSWindowsService.
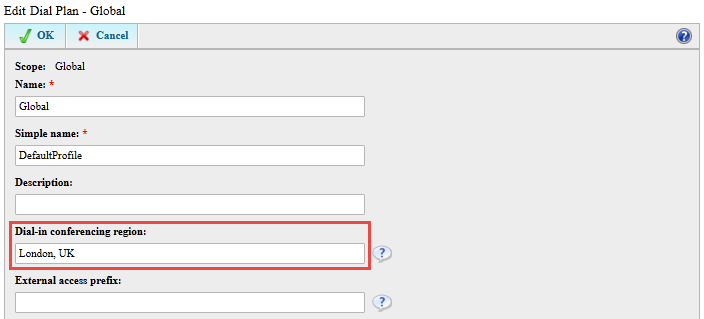
Next, ensure that a dial-in conferencing region is configured. Typically, you need to configure multiple regions and assign local access numbers. In the following example, we add a default region in order to generate an H.323 or standard SIP number that users can dial into from any standards-based room system. The naming convention is not important but you must populate the dial-in conferencing region to complete the configuration.
To populate the dial-in conferencing region:
1. Open the Lync 2013 Server Control Panel and go to Voice Routing > Edit the Global Dial Plan > Dial-in conferencing region.
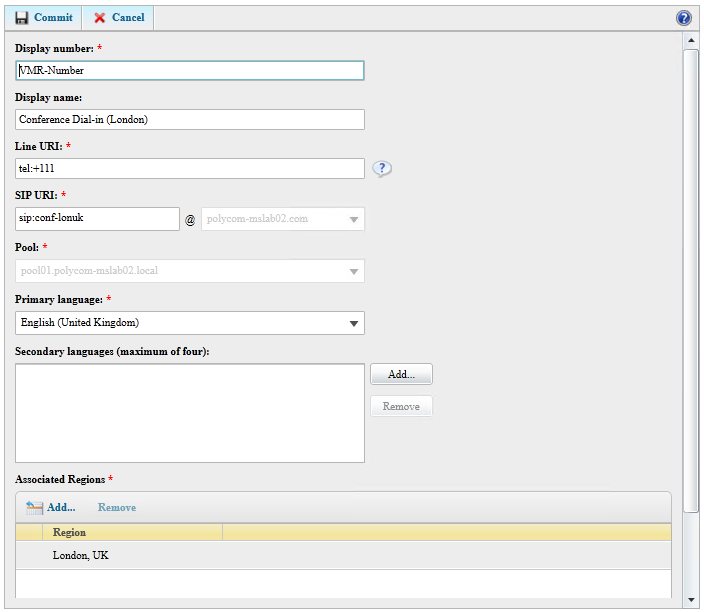
2. Specify a dial-in access number by going to Lync 2013 Server Control Panel > Conferencing > Dial-in Access Number > New and completing the following fields:
- Display number This field permits alpha numeric entry. This is typically the dial-in access number. This example uses the VMR or Conference ID and is labelled here as ‘VMR-Number’.
- Display name Choose a display name. Typically, this name matches the region.
- Line URI The line URI will not be used as the actual dial-in conference is not being used. This example uses a dummy number ‘tel+111’.
- SIP URI This field allocates a SIP address to the conference number. Though this field is not used for RealConnect, you must enter a SIP URI.
- Pool Enter the pool you are enabling for dial-in conferencing.
- Primary language This field is not used for RealConnect.
- Associated Regions Add the region you created in step 1.
Step 2. Customize the Lync meeting invitation, add H.323/SIP dialing instructions:
If you want to customize the meeting invitation, you can add custom footer text to allow meeting participants to join a meeting using a standards-based video endpoint.
- In the Lync 2013 Control Panel, go to Conferencing > Meeting Configuration.
- Edit the default global template as shown next.
This example shows external addresses. If you want to show external addresses, you need to enable standards-based video Firewall traversal using, for example, a Polycom RealPresence Access Director.
Your Lync environment now includes Conference IDs in Lync-enabled meeting invitations.
Step 3. Configure DMA (SIP Peer):
Next, complete the Lync 2013 and DMA integration. Configure DMA network settings to match the Lync Server, specifically, Time and Domain. You need to configure the domain to match the extension you gave to the DMA DNS name.
Next, specify domain and time on the DMA system.
To specify domain and time on the DMA system:
1. In the DMA administrator screen go to Local Cluster > Network Settings > General System Network Settings.
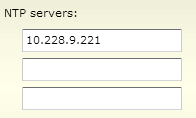
2. Configure the time to synchronize with the same source as the Lync Server, typically one of your domain controllers, by going to Local Cluster > Time Settings. Specify an IP address for your time server as well as a time zone.
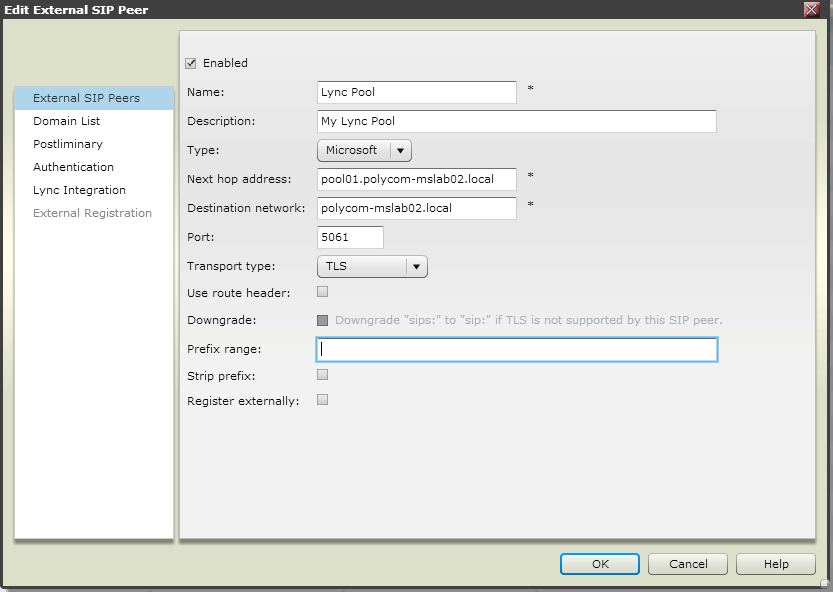
Next, add the Lync Server as an external SIP peer. To add the Lync 2013 Server as a SIP Peer:
3. In the DMA administrator console go to Network > External SIP Peers > Add. Complete the following fields:
- Name Enter the name you gave to this Lync Front End Server or Pool.
- Description Enter a description for Name field.
- Type Choose Microsoft.
- Next hop address Enter the fully qualified domain name for your Lync Front End Server or Pool.
- Destination network Enter the Active Directory domain for your Lync Front End Server or your Pool. Do not enter your SIP domain.
- Port Enter 5061.
- Transport type Enter TLS
You can leave the remaining fields blank.
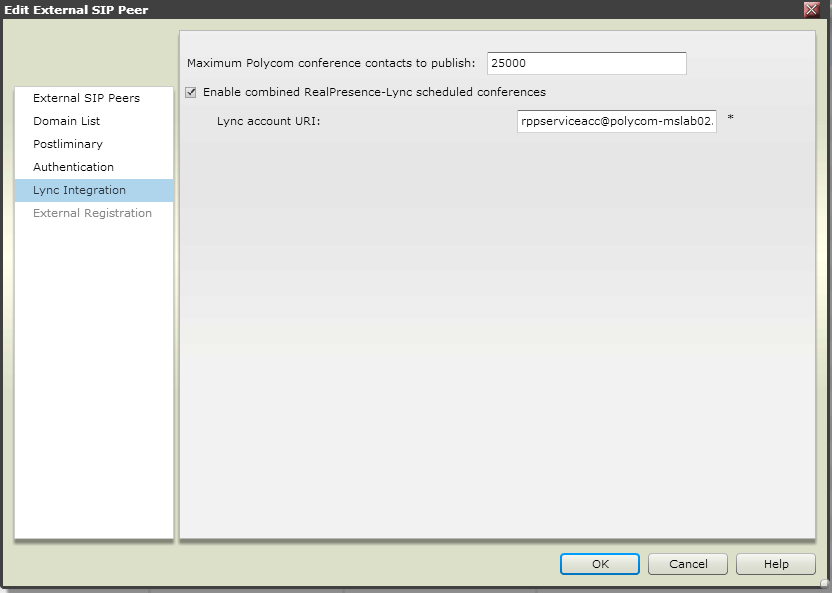
4. In the left window, click Lync Integration.
5. In Maximum Polycom conference contacts to publish, enter the maximum number of VMRs you are publishing presence for. This field is not required for RealConnect. This example sets the maximum at 25,000, the recommended number.
6. Check Enable combined RealPresence-Lync scheduled conferences.
Step 4. Create a RealPresence Platform Lync account:
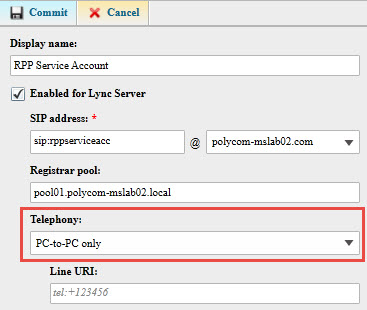
Next, assign a Lync account. This can be an existing account. However, Polycom recommends creating a dedicated Lync account that can be used to perform Conference ID to Lync Conference SIP URI resolution. In this case, the account can be a Lync account enabled for PC-to-PC telephony, as illustrated next.
Edit Lync Server User – RealPresence Platform Service Account
Step 5. Configure and enable the DMA Lync conference dial rule:
Next, create a conference template that is assigned to RealConnect Lync conferences.
To create a conference template:
1. Conference mode Set to AVC only. Mixed mode is not supported.
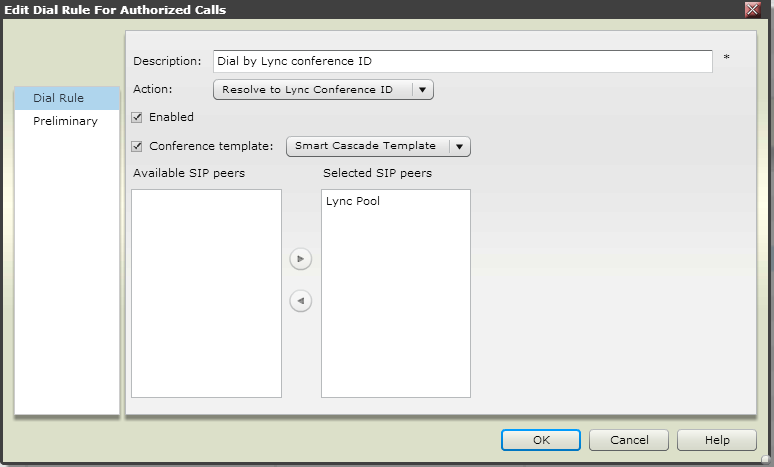
2. Enable the dial rule on DMA by going to the DMA administrator screen > Call Server > Dial Rules.
The Description field displays Dial by Lync conference ID.
3. Highlight the Dial by Lync conference ID and select Edit.
4. Check Enabled to enable the rule and the Conference template created in the previous step.
The available SIP peer(s) you assigned displays in Selected SIP peers.
5. Click OK.
Your RealConnect for Lync deployment is now complete!
Step 6. (Optional if not already configured) Ensure ICE is enabled on your RMX:
This configuration isn’t specific to RealConnect, however RMX 8.4 introduces a mandatory requirement, specifically where ICE needs to be enabled in all types of Lync deployment scenarios (with or without Edge deployed).
There are two supported methods, either user-based or a new method introduced in RMX 8.4 that leverages a UCMA option, with this we’re able to scale greater than 12 connections for remote worker/Federated scenarios. In the configuration example below we’re going to use the new approach which is now recommended.
To perform this configuration please refer to the new Trusted Application configuration within the sub-chapter Configure Lync Server for use with a Polycom RealPresence Collaboration Server System on page 61 of the Polycom UC Deployment Guide for Microsoft Environments here


