Understanding Skype for Business Online Web Sign-In
As many of you are no doubt already aware Skype for Business on-premises provides a mechanism for users to easily sign into IP telephony devices, this process is referred to as PIN authentication. It provides end-users with an easy way to authenticate with Skype for Business without the need to input a full username and password on the phone. Of course, if the phone is paired with your desktop PC via “Better Together” functionality this makes things easier, but given that 3rd party interoperability program or (3PIP) devices require additional software for network-based pairing – this often isn’t deployed.
Now let’s level set on a few limitations to be aware of with PIN-based authentication:
1. As an IT admin DHCP options needs to be configured appropriately, specifically option 43. This lets the phone know the location for the certification provisioning service, this then in turn facilitates a secure TLS channel between the phone and the Skype for Business server. Once the authentication is completed the phone retrieves a client certificate which facilitates access to various services, this process is referred to as “TLS-DSK”. This private certificate provisioning service isn’t published externally, so remote workers need to use the process previously mentioned, “Better Together”.
Note: Polycom VVX phones can be configured to work in absence of deploying this option (provided Internet time is configured and available), refer to the parameter dhcp.option43.override.stsUri documented within the UCS Lync and Skype for Business Deployment Guide.
For more information on Option 43, I’d recommend you refer to this post by Jeff Schertz.
2. Given that PIN authentication grants the phone access to Skype for Business services this does not help with Microsoft Exchange, for this NTLM sign-in is still required. Once complete calendaring details can be populated – this is important if you want to perform Skype for Business “Click-to-Join” from the phone’s calendar.
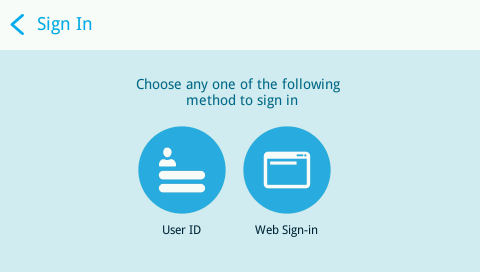
So now let’s talk about Skype for Business Online Web Sign-In, this is a new (heavily understated) feature that allows users with Skype for Business Online accounts to sign into their phone with minimal phone intervention or the need for the 3PIP Better Together AKA the “Better Together-over-Ethernet” companion application.
Let’s first walk you through the process and then we’ll examine how it works.
Step 1: We select the new Web Sign-In option via the phone home screen
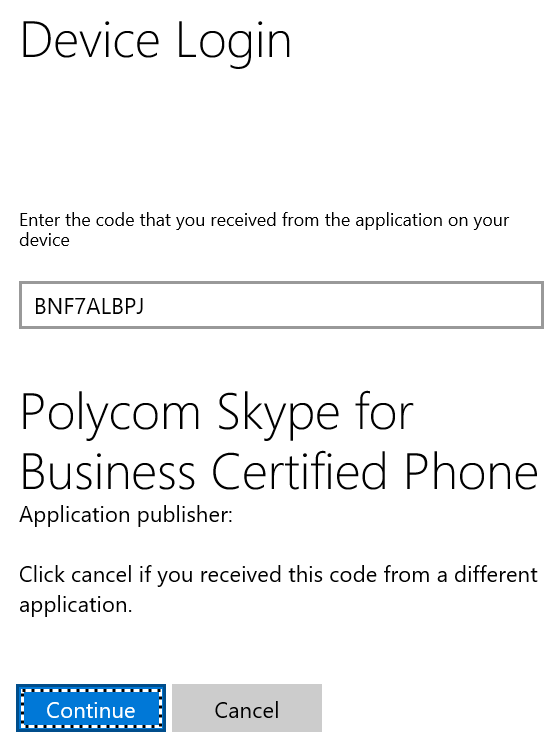
Step 2: Once Web Sign-In is selected the phone displays a unique device code, this code is generated within the region the phone is set to and is retrieved via the Device Configuration Web Service
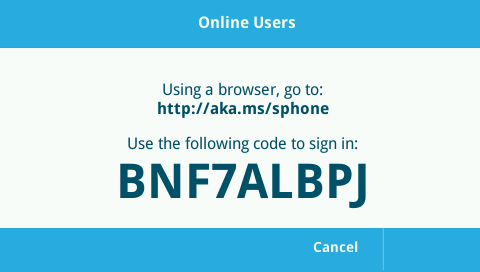
Step 3: Via your computer web browser access the web page displayed on the phone and enter the email associated with your Skype for Business Online account
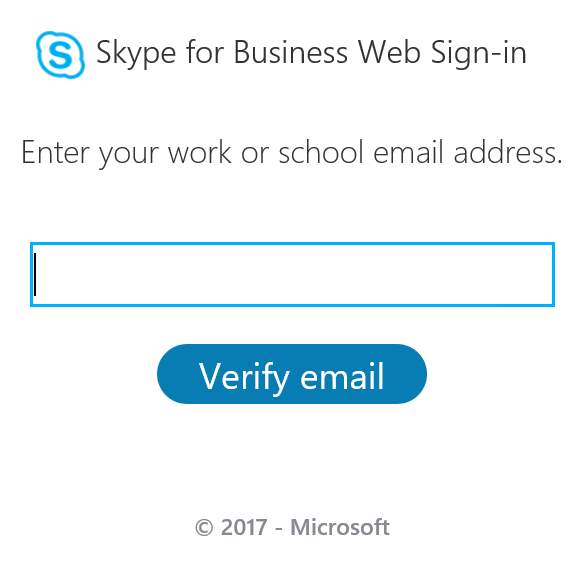
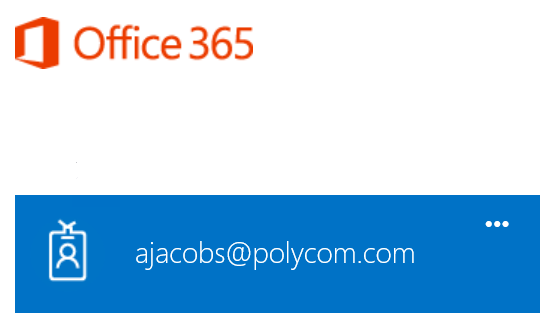
Step 4: Once the email is entered the user is prompted to sign-in with his or her Office 365 account credentials
Step 5: Enter the device code displayed on the phone screen

Once the code is entered the phone vendor details are displayed
Finally the web page acknowledges that sign-in is complete and the browser session can be closed
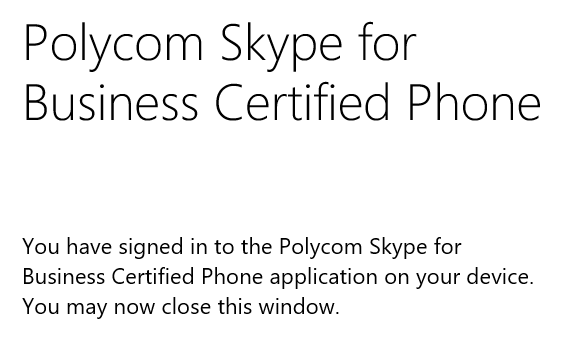
The phone sign-in completes without any user intervention

That’s it!
Next up let’s look at how this works behind the scenes. The first thing we need to understand is that Modern Authentication (OAuth 2.0) is used to facilitate this authentication process. Note: even with Skype for Business Online set to
“Set-CsOAuthConfiguration -ClientAdalAuthOverride NoOverride”
(as per documentation here) Web Sign-In is still possible.
The flow chart below outlines the interaction via the various services:
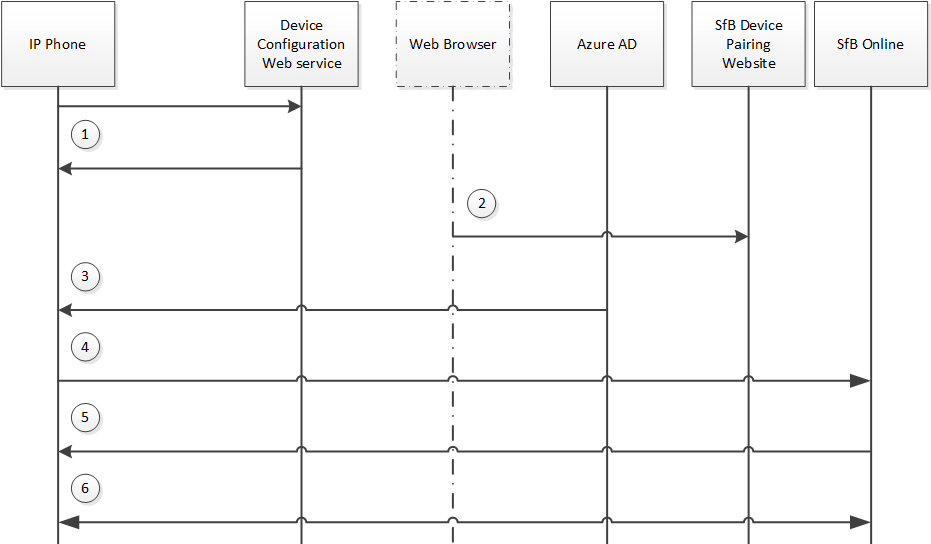
Step 1: The IP Phone requests a localized device pairing site and pairing code (valid for two minutes).
Step 2: The end-user opens their local device pairing website within their web browser. After inputting their device pairing code they are redirected to the Skype for Business device pairing website (where authentication credentials are added).
Step 3: Once authentication is completed an OAuth 2.0 access token is shared with the IP Phone.
Step 4: The users UPN is extracted from the token and Skype for Business autodiscovery is performed against this account.
Step 5: The Skype for Business online server responds and issues a user certificate (valid for 8 hours) with the access token. Remember TLS-DSK?
Step 6: SIP registration completes. That’s it!
If you’ve not tried IP Phone Web Sign-In then I’d recommend you give it a go, as always comments welcome.